|
Modelling
Structures in Card
An abridged version of this tutorial was originally published
in the ETE Express, No. 112, 4th Quarter, 2006.
Card, defined here as heavier weight paper and various cardboards, has
a long tradition in modeling in Germany and Eastern Europe, especially
Poland. While plastic kits and scratchbuilding supplies are dominant,
card can hold its own against these and provides some great opportunities
for creating unique models.
I was first introduced to card models as a child when my father brought
back a number of structures made by Schreiber-Modellbogen including castles
and aircraft. Schreiber is one of the oldest manufacturers of card models
and their kits are provided as printed “artwork”. There are
many other manufacturers of these kits as well. Links to some are provided
in the online version of this article, the URL to which is provided at
the end of the article. Over the years I have very much enjoyed building
these kits, most of which that found their way onto our layouts. Many
years later, after rediscovering the train bug, I very quickly started
researching the availability of these kits. I discovered that they were
not only very much available, but also that other vendors had become available
and new methods of creating kits were introduced. While I have some plastic
kits on my layout, the vast majority are card, most from kits by Schreiber
and Stipp. However, scratchbuilding has taken over and is a trend that
allows me to create unique structures to fit particular situations. I
will also confess that my background in bookbinding and conservation have
helped tremendously in working with paper and card, with the tools and
techniques required for both are highly interchangeable. Some of these
kits, primarily Stipp’s (under the Auhagen brand) half-relief background
models are available in the US from Euro Train Hobby. The Schreiber models
will need to be ordered from Germany through a vendor such as Scheuer
& Streuver/Moduni, but as service is excellent this should not be
a concern. Links to both are provided at the end of the article.
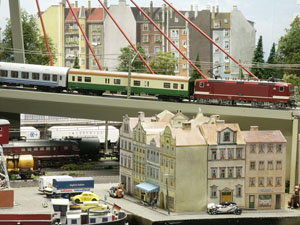 
Card models by Schreiber (left) and Stipp (right) – Click image
to enlarge
Card kits most commonly make use of traditional “artistic”
techniques using patterns and colors to render an object on flat paper.
Schreiber and most others use this technique. While the results of this
process can look quite attractive, they can also come across as toy-like.
Stipp pioneered the use of “photo realism” by which photographs
of actual structures are used to create card models taking them to another
level. The photo realistic reproductions give the image a great deal of
visual detail and depth, something lacking in the “artistic”
card models. The image above shows models by Schreiber (including the
barge) on the left and Stipp on the right. Assembled as printed all of
these kits can look very attractive, especially in the background, but
would benefit from additional detailing to work better in the foreground.
That said, I enjoy using them in the foreground for sentimental reasons.
Thanks to the working properties of card, this detailing can be easily
accomplished giving results that can rival plastic. Something to keep
in mind is that even though the surface of card is smooth, many of the
details such as brickwork as rendered in plastic are very exaggerated
when one considers that a depth of 0.1mm on an H0 model corresponds to
roughly a centimeter – rather worn brickwork. This difference is
even starker in smaller scales. By developing proficiency in some basic
techniques will lead to a much higher degree of 3-dimensionality and eventually
to scratchbuilding.
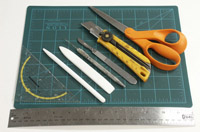 The
required tools are very basic and not that different from those used for
building kits with plastic. The most important of these are sharp scissors
(small and larger), VERY sharp scalpels (surgical blades are best and
as in Chicago politics, one changes blades early and often), a fine burnisher
or bonefolder, a very fine needle awl, a dull needle for creasing, a variety
of straight-edges, and a self-healing cutting mat. The latter is critical.
While one can cut on scraps of cardboard, these very quickly get “chewed
up” leading to ragged and torn cuts on the paper. In terms of the
scalpel blades I prefer the #10 surgical blades that are curved as they
have less of a tendency to tear the paper. Surgical blades are sharper
than X-acto blades, and better in my experience for cutting paper. For
adhesives I recommend “white” glues such as Elmers™
or Sobo ™ (both available in craft stores), or solvent based glues
such as Dupont Duco™. Cyanoacrylites can also be used and are great
for very small details. Experiment to see which works best for you. What
is VERY important to keep in mind when working with card is that water
(or any moisture) causes the paper to expand parallel to the grain causing
waves and other distortions that can be difficult to repair. Paper-grain
is a function of its manufacuture and all papers and cardboards have it.
For an example of this, wet a piece of paper and card and watch what happens.
While one won’t have a choice in materials when building kits, one
does when scratchbuilding. To scratchbuild my models I like to use rag
matboard, such as that used for framing pictures, because it is softer
than chipboard and easier to work, never mind being gentler on scalpel
blades. Depending on how one builds their models, folding and gluing vs.
cutting and gluing, the foldability of the material will be critical.
Not all card /folder weight papers fold cleanly so experiment.. The
required tools are very basic and not that different from those used for
building kits with plastic. The most important of these are sharp scissors
(small and larger), VERY sharp scalpels (surgical blades are best and
as in Chicago politics, one changes blades early and often), a fine burnisher
or bonefolder, a very fine needle awl, a dull needle for creasing, a variety
of straight-edges, and a self-healing cutting mat. The latter is critical.
While one can cut on scraps of cardboard, these very quickly get “chewed
up” leading to ragged and torn cuts on the paper. In terms of the
scalpel blades I prefer the #10 surgical blades that are curved as they
have less of a tendency to tear the paper. Surgical blades are sharper
than X-acto blades, and better in my experience for cutting paper. For
adhesives I recommend “white” glues such as Elmers™
or Sobo ™ (both available in craft stores), or solvent based glues
such as Dupont Duco™. Cyanoacrylites can also be used and are great
for very small details. Experiment to see which works best for you. What
is VERY important to keep in mind when working with card is that water
(or any moisture) causes the paper to expand parallel to the grain causing
waves and other distortions that can be difficult to repair. Paper-grain
is a function of its manufacuture and all papers and cardboards have it.
For an example of this, wet a piece of paper and card and watch what happens.
While one won’t have a choice in materials when building kits, one
does when scratchbuilding. To scratchbuild my models I like to use rag
matboard, such as that used for framing pictures, because it is softer
than chipboard and easier to work, never mind being gentler on scalpel
blades. Depending on how one builds their models, folding and gluing vs.
cutting and gluing, the foldability of the material will be critical.
Not all card /folder weight papers fold cleanly so experiment..
Instructions for card kits are very basic, some might also say absolutely
minimalist, with parts generally numbered in order of assembly. Cutting,
folding, scoring/creasing instructions are provided in the form of a simple
diagram and understood to be universal even though there are variations.
After building a few basic kits, these instructions will make much more
sense. See the list of tutorial links at the end of the article for some
online tutorials in English and German.
One of the most effective ways to add detail to card models is to recess
details such as windows and doors, or to bring forward details like balconies
or window boxes. While some kits will come with extra parts such as windows,
color copiers and scanner/color printers can be a means of providing additional
pieces. An example of adding detail would be to carefully cut out the
window and adhere a piece of card with the desired amount of setback from
behind to the area where the window was. Then, cut out the area of the
window again and tone down the edges with acrylics, permanent markers,
or colored pencils. Be careful with water-based colors and ink-jet printed
paper. Even when fixed, the moisture needed for these to blend can cause
the inkjet to bleed.
Next mount the window previously cut out onto a larger piece of card
leaving extra space along the edges. Adhere this to the model from behind
so that the window is precisely positioned in the cutout. Using the same
technique one can also bring forward details such as doors, ledges, trim,
and window boxes. Once these techniques are understood and mastered it
is logical to take the next step towards scratchbuilding, either from
a photograph of an actual structure, or to free-lance your own using elements
of from real structures.
SCRATCHBUILDING A STRUCTURE FROM AN IMAGE

The Bergbau-Grill Bochum – Click to enlarge
The Bergbau-Grill Bochum was created from a photograph of a typical Imbißbude
(snack shack) found in the industrial regions of the Ruhr and elsewhere
in Germany. Only the front was captured in the image that was taken with
a very basic point and shoot digital camera. First, the resolution of
the image was increased to 600dpi to make it easier to manipulate without
losing details. Next, distracting elements such as the car, railing, and
background were removed in Photoshop or similar editing software. Using
this software, one can also correct perspective distortions. Next important
details such as the waste bin, vending machine, and sign were copied,
carefully cleaned up so that only the detail remains, and positioned adjacent
to the structure in multiples. To determine proper scale a search for
standardized door heights in Germany was done with one applied to the
model. If the original intent had been to make a model of this structure,
obviously measurements would have been taken on site. With the door height
established, the image as a whole was scaled to 1:87. Once the height
of an element such as the door is established, the model can be sized
to any scale.
After printing, the sheet with the image was backed with a repositionable
(3M 568 Cold Mount) mounting adhesive. Door and display window were cut
out before the facade was adhered to mat board. After rubbing down firmly,
the mat board in the area of door and display window was cut out, the
cut edges sanded smooth, and then toned down to match the color of the
wall. The door and display window were then adhered to card and trimmed
slightly larger before gluing into place. Raised elements such as vending
machine, trash can and signage were cut out from the extras, mounted on
mat board of varying thicknesses, trimmed out, toned and then glued into
place on the model. Finally the side and back walls, and the roof were
cut out of mat board and card, glued together, painted, and weathered.
The image below shows the model in place on the layout. A downloadable
version in scales H0, N, and Z is available on
the Bergbau-Grill page. There you’ll also find other images
of the model flanked by unmodified card models made by Stipp.

The Bergbau-Grill Bochum on the layout
SCRATCHBUILDING A STATION

The new hauptbahnhof from the street side
When I decided to replace my Faller “Bonn” station with something
more original, I had my father take images of the brickwork, windows and
other details of the station in his native Duisburg, the area I am most
familiar with. While I made some basic diagrams, once I began construction
I worked as whims dictated making many modifications on-the-fly. Elements
desired for the model of the station were then selected from among the
images and scaled as close to H0 as possible while still allowing details
to show. The windows of the Duisburg station are very large, so I reduced
them in scale once I had determined the overall proportions of the station.
All these elements were then placed on individual sheets with just brickworks,
details, windows, …
After creating all the necessary sheets, multiples were printed out allowing
for extras. All walls were cut to size from 4-ply matboard and taped together
so that any sizing issues could be worked out. Next, the sheets of brickwork
were applied using 3M’s mounting adhesive. All whole window units
including trim were then adhered to thin card using the same adhesive,
cut out along the outer edge, and adhered into position. Next I cut out
the window to the inside of the trim also cutting through main wall. The
edges of the board were then lightly sanded and toned to march the color
of the trim. Next another sheet of windows mounted onto thin card and
cut out leaving a border all around. These were then adhered to the facade
from behind so that the windows were precisely positioned. The most tedious
work now completed, the wall units were assembled to create the “wings”
of the station.
The center section of the station was assembled in a similar fashion,
except that the window details were made of thin card for the trim and
clear plexi laid behind to allow light to enter the hall. The inside was
detailed with murals on both sidewalls and low-relief representations
of ticket windows and kiosks. To go from street level to track level a
ramp was built. The overhanging roofs were created of matboard and assembled
separately. Laying down strips of black paper simulated the tarpaper on
the roof. The roofs were then adhered to the walls of the station. To
aid with placing figures and other details, the roof of the central section
is removable.
To complete the station, signage, posters, mailboxes, vending machines,
and other details were created from images found online and in personal
photos, mounted on board as necessary and adhered to the station before
it was put in place on the layout. The canopies of the old Bonn station
will remain for now, but will be replaced once suitable ones are designed.
As I tell the story, the money to replace the canopies ran out as the
station was being built during the Weltwirtschaftskrise (Depression).
Then, after actually surviving the war fairly intact they were left in
place, but are scheduled replaced in the course of future station renovations
with something appropriate to the 70s.
It was not until after I had finished the model that I discovered Scalescenes,
a company in the UK, that’s makes some very nice downloadable (for
a minimal fee) sheets of brick and stone work, concrete, and more, that
are similar in coloring and the use of which would have saved me large
amounts of effort. Nonetheless, the experience was invaluable for learning
how to do this myself should parts not be available.
More images of both these projects, and others, can be seen on the scratchbuilding
page.
Online
and Print Resources | Top | Tutorial
Tutorials:
Vendors:

Schreiber-Bogen Tutorials:
Tips on tools and technique in English including videos.
- Kartonmodellbau: Examples of
models and scale drawings for card modelling numerous German railroad and
other structures.
- Clever Bros. Models: Use computer
design and digital photography to duplicate any structure - real or imagined,
in any scale. Their model kits use a special high strength, card stock. Our
kits are cut and folded by the hobbyist into beautiful three-dimensional miniatures.The
texture sheets are printed on high quality, self-adhesive paper. In the future,
we hope to make our models even better by introducing Laser cut small parts
and embossing the texture sheets.
- Fiddlersgreen: World's largest
collection of paper models.:
- Iceberg: Paper models
- Joswood: Der Modellbauer im Bergischen
Land. High quality laser cut card models for northern German scenes and more.
- Jowi / Modellbahn Hintergrund:
Background and background model CDs for printing on card... Features industrial
scenes, modern architecture, and the more traditional. Great for kitbashing
with too.
- Kartonbau-Forum: German language
(primarily) for card modellers.
- Mitteldeutscher Kartonmodell-Verlag:
Lots of DDR based kits including structures and Trabis...
- Moebo-exclusive: Laser-cut card
models with the Ruhr as the prototype.
- Paper Model Store: Card models
from throughout the world.
- Papiermodelle.de: Downloadable
paper models of all types, with links to more. In German.
- Perceptions
- The Paper Train Factory: Chapter member Ed Schulman's passion. Precision
scale paper model train kits. This growing list of kits represents unique
trains from around the world. Take a few nights off - relax - play - dream,
and build your own collection of train models.
- Scalescenes.com: UK prototype card
models many of which would be suitable on any Eurolayout. Models are scaled
to 00, and delivered as PDF files. Print
at 87% from Acrobat for H0.
- SCHREIBER-BOGEN im INTERNET:
Paper models suitable for layouts. In German.
- Stipp: Paper models suitable for layouts.
In German.
- Super Quick: Card model building
kits from the UK for 00 and H0 model railway layouts.
- TGVweb:
Build your own TGV from paper kits.
- Wordsworth
Model Railway: Downloadable (pdf compressed as .rar) kits that are 00
UK outline but can be adapted. Print
at 87% from Acrobat for H0.
Webrings and Online Fora:
In Print:
- Alva Hansen. Card
Modelling Basic and advanced Techniques.
- Eisenbahn Journal: Anlagen & Plannung,Gebäude-Modellbau,
April 2005.
- MIBA: Issue 8/2000 has a special focus on working with card. Available
by ordering from MIBA in print or on
a DVD of all back issues up until 2005.
Supplies/Materials:
- 3M
Mounting Adhesive: Available from Gaylord Brothers.
- Matboard (2 and 4 ply) go to local framers and ask for scraps, or
art supply stores
- Folder stock: Filefolders or similar weight papers. Office and art
supply stores.
- Tools can be had from Micro-Mark
and bookbinding suppliers such as Talas
and Gaylord Brothers who can supply
tools such as Teflon burnishers (bonefolders) in various sizes. These
have the advantage of not marking the material when rubbing.
- Folders and burnishers from Gaylord – Teflon
or bone.
- Folders and burnishers from TALAS – Teflon
or bone.
About the Author
Peter Verheyen was introduced to the hobby as a child, rediscovering
it following the birth of Hope's and his daughter. Clinging to H0 (AC)
analog operation his layouts have grown in size and complexity with lots
of room for shunting. Interests include DB/DR era 3-4 (mostly) operation,
scenery, card modeling, and scratch building. He can be reached at <verheyen@philobiblon.com>.
|


