-
A 5-year running archive is accessible to subscribers only. To gain access, click on link above and then using the email you subscribed under register a password towards the right hand side of the page.
ABOUT BOOK_ARTS-L
- Subscribers, to post a message send to: book_arts-l@listserv.cc.emory.edu
- Full FAQ
with detailed instructions
- Put ALL commands in body of message and send to: listserv@listserv.cc.emory.edu
- To Subscribe send:
subscribe Book_Arts-L "Your full real name"
Leave out the "" . All subscription requests must include the full real name or they will not be approved by the moderator.
- For daily digest: set Book_Arts-L mail digest
- To unsubscribe: unsubscribe Book_Arts-L
OTHER RESOURCES
 The
Multi-lingual Bookbinding/Conservation Dictionary Project: The goal
of this project is to combine, in one place, all the known bookbinding
and book conservation terminology, in as many languages as possible.
- Other Book_Arts-L Projects:
- Liberated Books: New uses for discarded books...
Springback (Account) Book Binding
By Peter Verheyen and Donia Conn, © 2003.
Version of article published in the New Bookbinder, Journal of Designer Bookbinders, Vol 23, 2003. Download original article. All images for this page were updated 22 June 2024.
Introduction:
These instructions for making a springback account book are derived from my notes as an apprentice at the Kunstbuchbinderei Klein, with adaptations over time. While my training is in the German tradition, the steps outlined should not be radically different from the English tradition. While the technique was originally patented in Great Britain in 1799 by John and Joseph Williams 1, the authors have found few descriptions of this technique in contemporary English language texts. Alex J. Vaughan describes the technique with great detail in Section II, Stationery Binding of Modern Bookbinding. There is also an historical mention in Bernard Middleton's History of English Craft Bookbinding, but it does not detail the steps required to complete a binding. The German binding literature, however, covers the springback quite thoroughly in such texts as Thorwald Henningsen, Paul Kersten, Heinrich Lüers, Gustav Moessner, Fritz Wiese, and Gerhard Zahn, and the technique is still required learning for all hand bookbinding apprentices in Germany.
As a style, the springback is firmly rooted in the 'trade' binding tradition. The springback's robustness, and ability to lie flat and open for extended periods of time without stressing the spine unduly make the structure ideal for use as account and record books. These same qualities make it suitable for guestbooks, lectern Bibles, and similarly used books. Regrettably the structure has not seen much use on fine bindings or in contemporary book art, especially as the structure would be a suitable platform for many elements of design bindings. It's thick boards would provide a canvas for more sculptural or inset designs. With some minor modification it could also serve as a means of presenting pop-up constructions.
The mechanics of the springback are quite intriguing. Thin boards are attached at the fold of an unbacked textblock. A spine stiffener is attached to the thin boards upon which the 'spring' is either built up in layers in situ, as demonstrated in this article, or is attached premade. The latter made of metal or molded heavy cardboard springs were also used, especially where springbacks were a large part of the business. The thick boards are then attached and the book covered. Upon opening the thin boards push against the spring, which then throws the text open, allowing the book to lie flat.
Description from Bookbinding and the Conservation of Books: A Dictionary of Descriptive Terminology, at CoOL.
Blankbook binding is one of the principal subdivisions of STATIONERY BINDING and differs greatly from the other major nit of binding, LETTERPRESS BINDING . One of the major differences is that blankbooks, or account books, as they are also called, are rounded but not backed, having instead a SPRING-BACK , which, in conjunction with the LEVERS , causes the spine of the book to "spring" up when the book is opened, thus giving full access to the gutter of the opposing pages. The best blankbook binding is very durable, with sewing on wide bands of webbing, rather than tapes, the ends of which are secured between split boards. The books also have heavy linings and strongly reinforced endpapers, called "joints" in a blankbook. In addition, it is not unusual for the folios to be sewn first to heavy cloth guards before being sewn to the webbings. Additional strength is sometimes imparted by hubs on the spine (which also protect the lettering) and bands either over or blankbook frame under the covering material. Although formerly always covered in leather, many blankbooks are now covered in heavy duck or canvas. Called "account-book binding" in Great Britain. (58 , 320 , 339 , 343 ).
The authors hope that these instructions will inspire binders and book artists to learn more about the structure and experiment with it.
Interactive cut-away diagram:
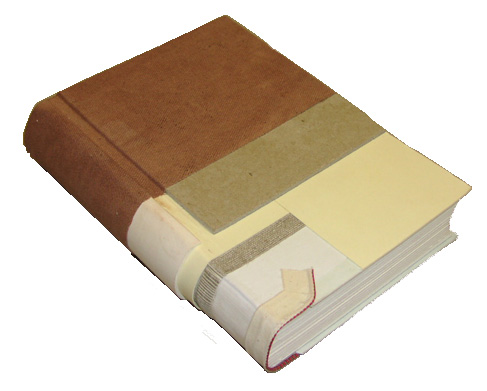
Move cursor over image for explanation
Textblock:
Fold and press signatures as usual.
Make the Endsheets:
Fold and cut four folios of plain endsheet paper and four single sheets of decorative or plain colored paper slightly larger than the textblock to allow for trimming.
Cut 2 strips of cloth or reinforced leather approximately 1 cm wide and greater than the height of your endsheets.
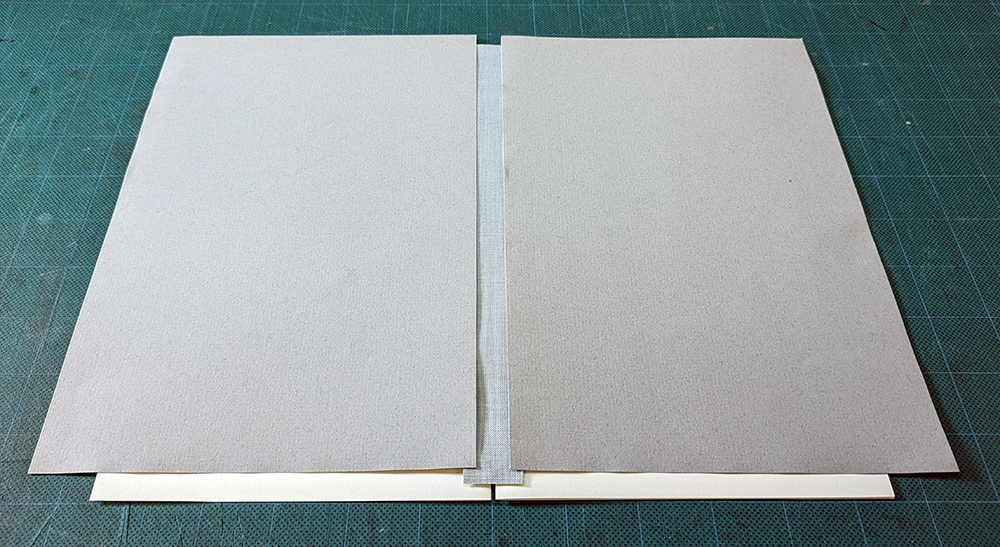
Glue up one of the strips of cloth (white or paper side if lined) and adhere 2 of the folios to the strip as shown, leaving a 1 mm gap between the folios.
Glue out decorative endsheets and put down, leaving as much of the cloth/leather strip exposed as desired.
Press and allow to dry.
Fold so that decorative sheets are facing each other and trim to size.
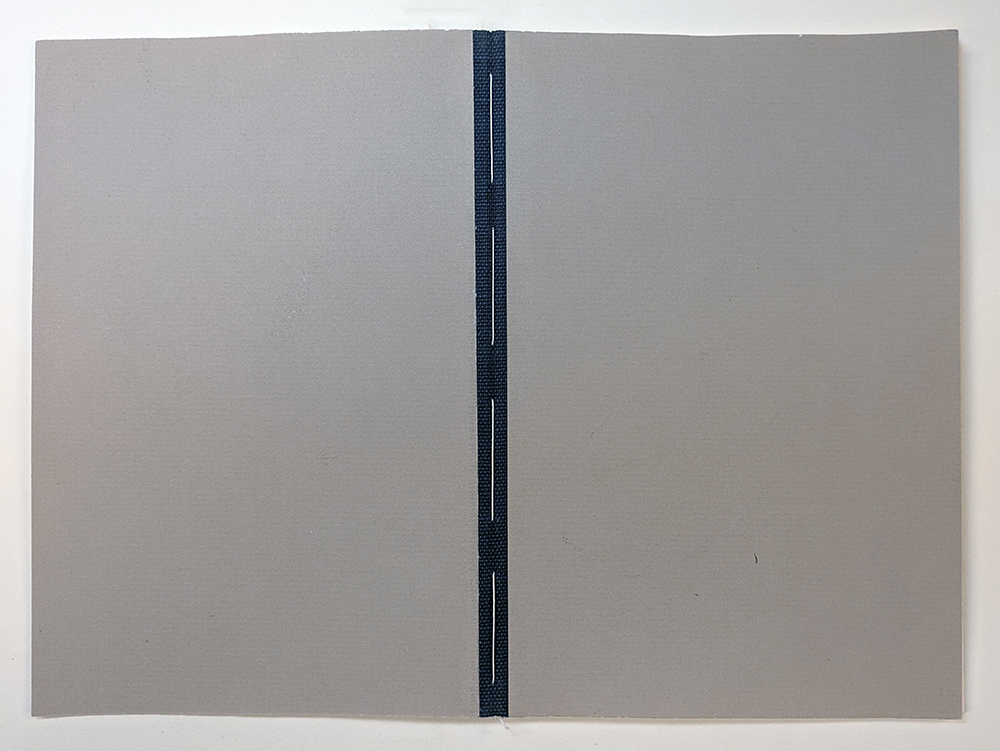
Below, the completed endsheet
Prepare for Sewing:
Tip the cloth 'guard' to the bottom of the 2nd and 2nd-to-last text signatures. Fold around 1st and last two text signatures. Trim signatures and endsheets to size and sew on tapes. (The textblock can also be trimmed after sewing).
Below, the make-up of 1st and last signatures

Sewing:
Sew on tapes. The final length of the tapes will be the width of the spine plus two times 1/3 the board width. Thread should be chosen so as not to introduce more swell than can be taken up during rounding (springbacks are not backed), which can be quite pronounced. A linked stitch can also used. The first and last leaves are waste-sheets and will be used to attach the thin boards to later.
Square up the textblock and glue up the spine with PVA. Let dry. This step is critical, and adhesion between the signatures must be solid or the book will fail.
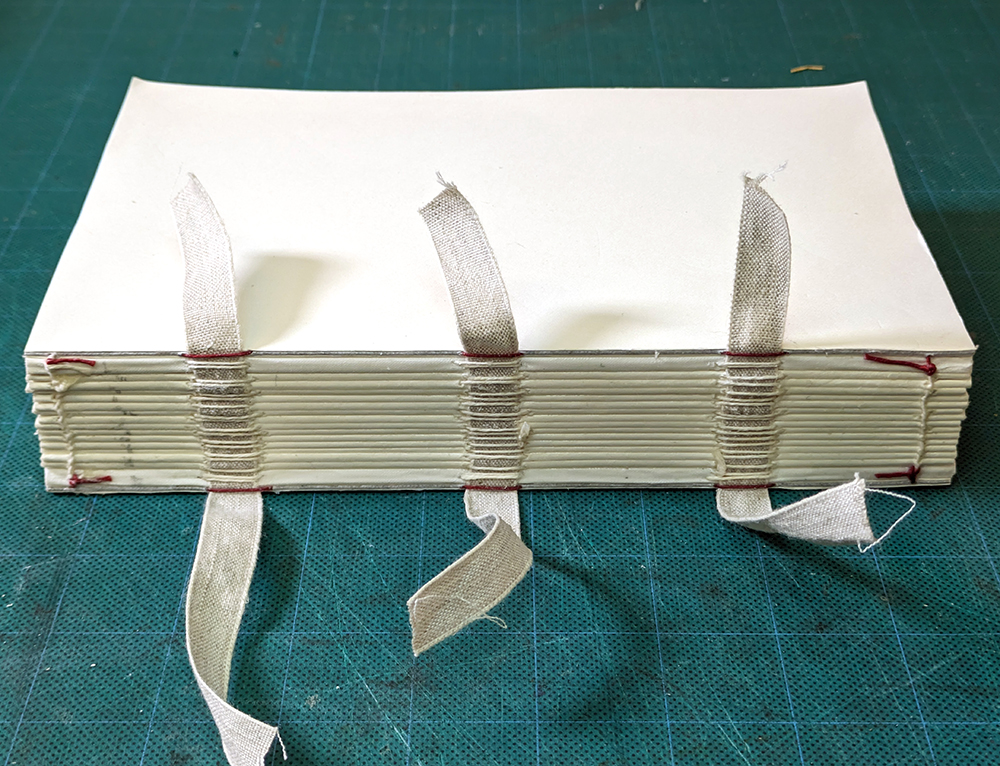
Above, the textblock after sewing and gluing up the spine.
Round so that the shape is more pronouncedly round than usual, and the swell eliminated.
Cut the cloth for lining the spine strips the length of the tapes and the width of the space between the tapes and tape/kettlestitch. The spine lining can be linen, muslin, or jaconette, and should be an appropriate weight for the size of the book. Glue to the spine with PVA.
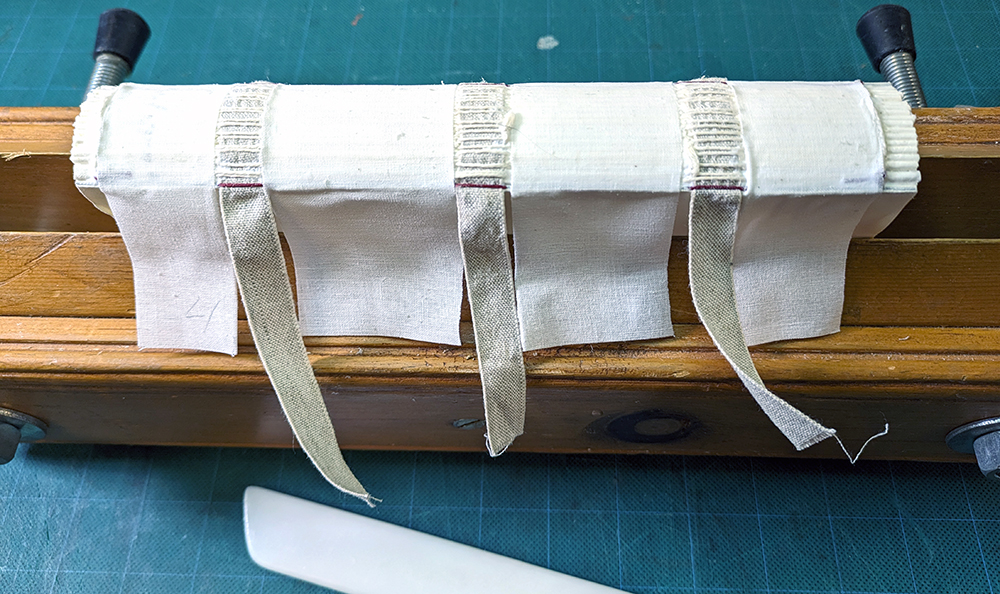
Thin Boards:
The thin boards act as a lever and work with the spring to throw the spine upward.
Cut 2 pieces of pressboard (25pt) or chipboard larger than the final board size to allow for future trimming of the final square. Glue out about 1/4 of the waste-sheet from the spine and attach the 'thin board' about 1 mm back from the shoulder.
.jpg)
.jpg)
Apply glue to the top of the 'thin' board and put down the tapes and spine linings so that they extend onto a third of the boards.
Below, the textblock with the tapes and spine linings adhered to the thin boards.
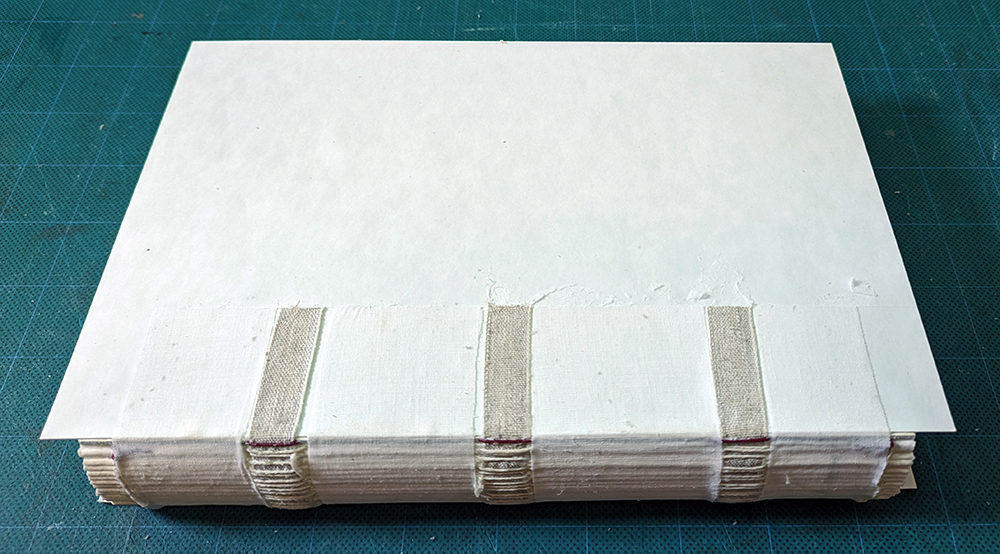
Endbands:
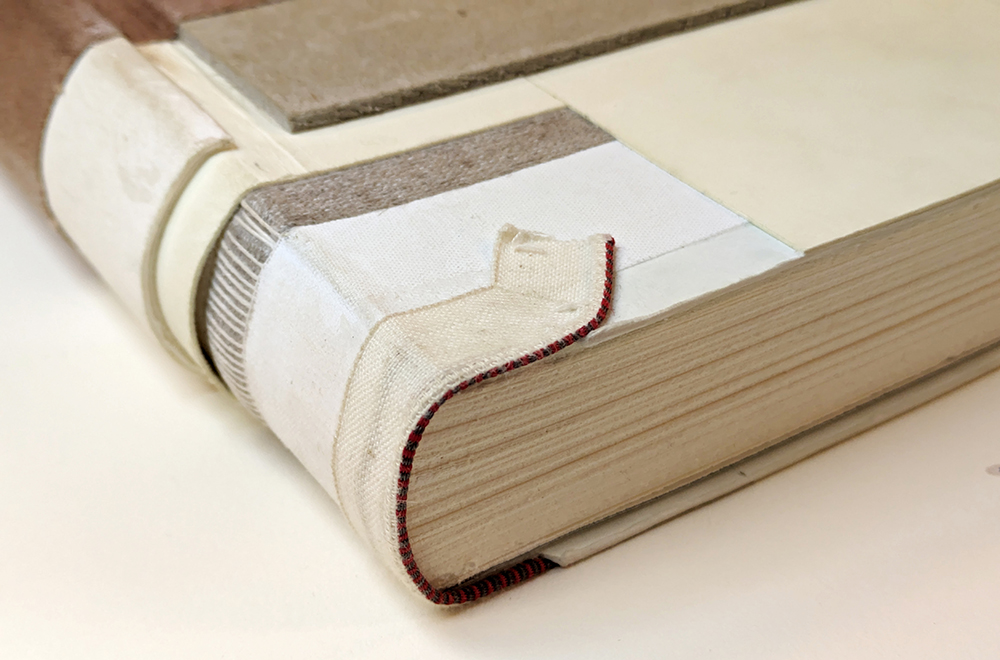
Trim out the 'thin' board to accommodate the endbands as follows: Cut 1.5cm from the shoulder along the head and tail edge of the textblock, then out at a 45º angle away from the spine to the edge of the board. (See Figures 7 and 8.) While machine-made or wrapped leather endbands are traditional for this style of binding, sewn endbands can also be used. In the latter case, do not trim out the thin boards, and sew the endbands as usual.
.jpg)
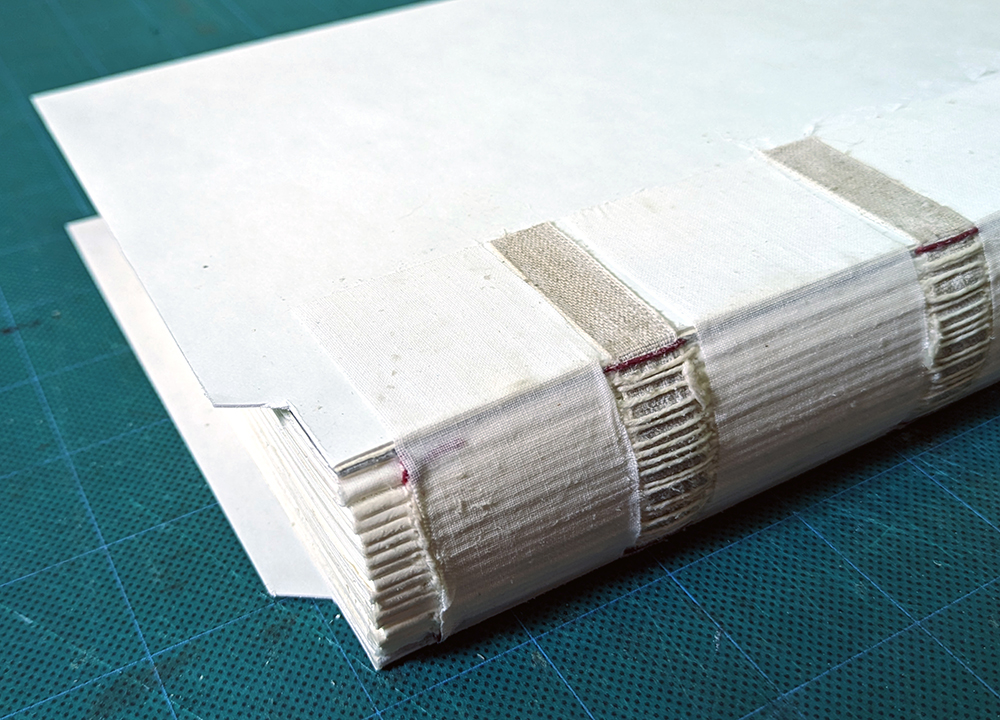
Glue the endbands onto the thin boards, angling below the board edge at the bevel. Cut a triangle out of the endband towards the ''bead' to facilitate angling. Using a scalpel, pare down the excess to reduce thickness.
Spine Stiffener:
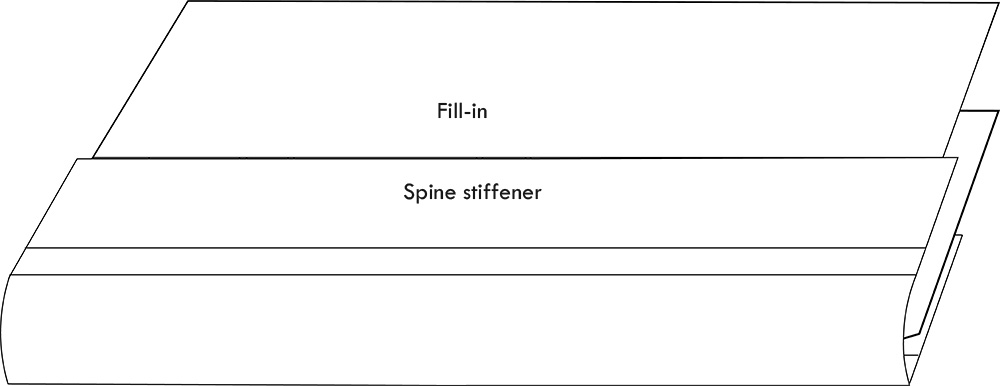
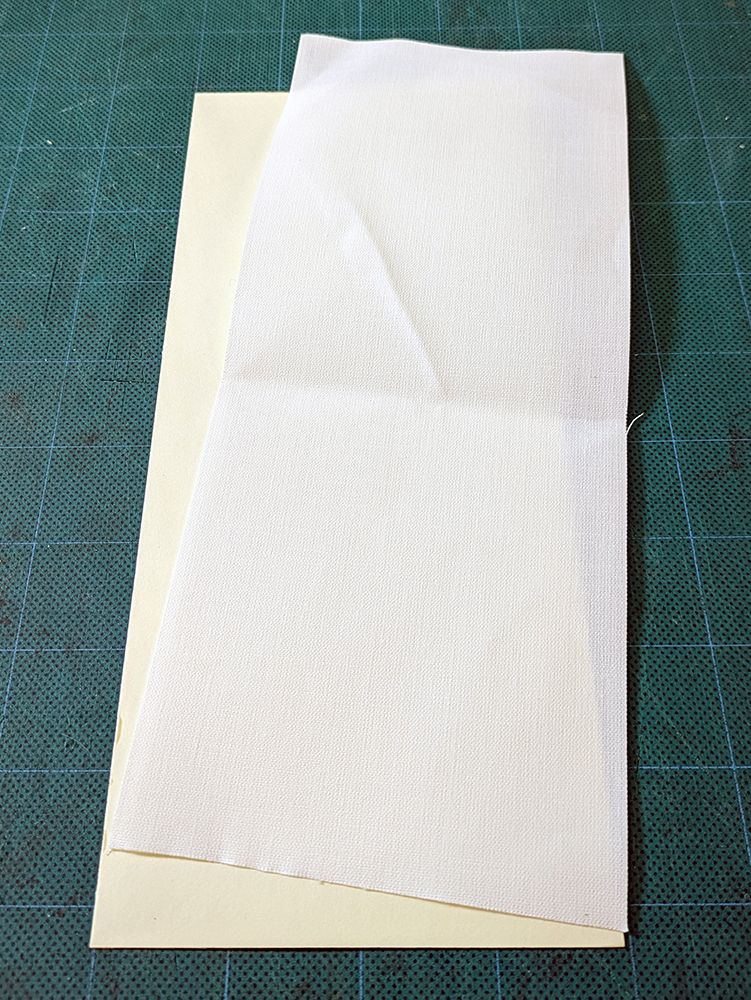
Cut a piece of 20 pt folder stock the length of the tapes and greater than the height of the book and line with 'hinge'' cloth or cotton muslin. The grain, as always, should be parallel to the spine. This will make the spine stiffener and form the foundation for the spring to be built up on.
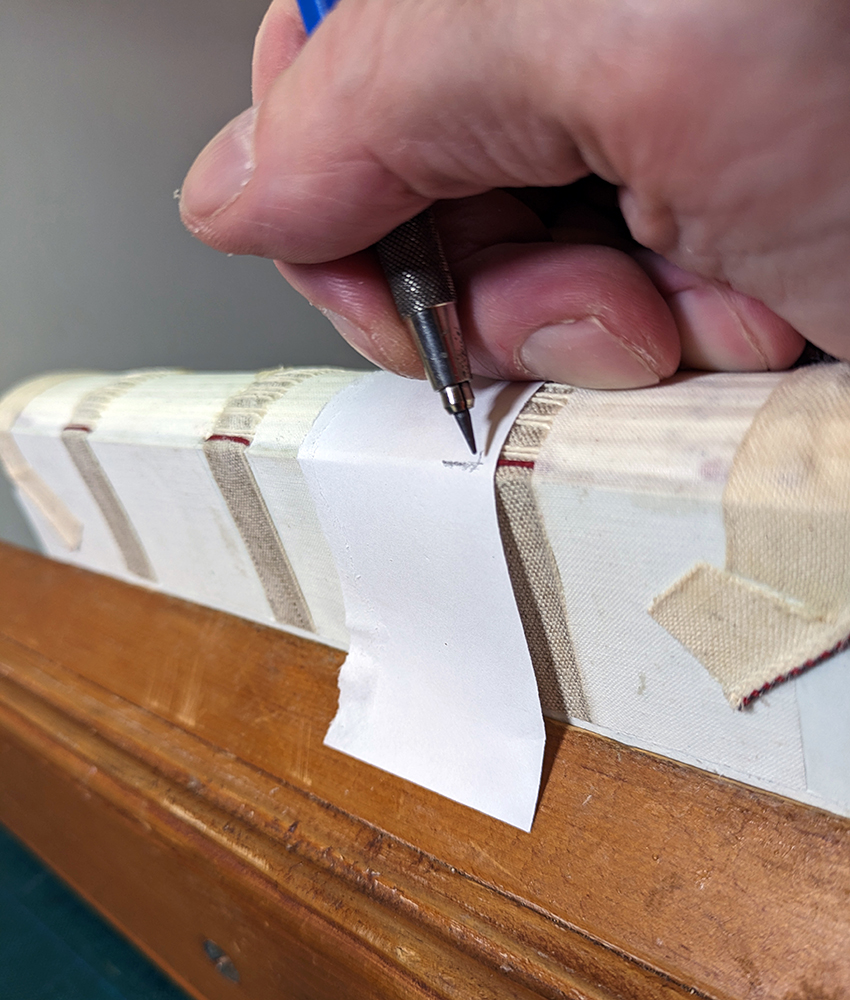
To measure the width of the spine use a strip of paper and. Transfer that measurement to the center of the stiffener, mark the width of the spine, then round the spine stiffener, and crease at the shoulder marks and 1 cm out from each of those creases. The cloth will face to the inside.
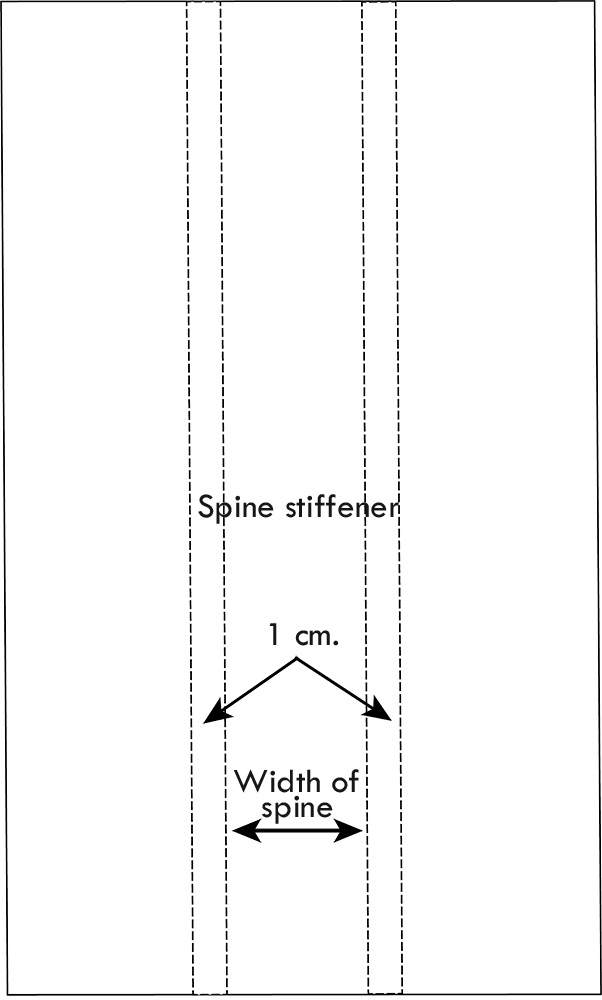
'Inside' of spine stiffener showing creases
Glue up the cloth side of the spine stiffener from the edges to the 1 cm creases and place on the book. Give a quick nip in the press to ensure adhesion.
Below, the spine stiffener attached to 'thin' boards'
.jpg)
Trim the tapes and cloth strips so they are even with the edge of the spine stiffener.
Fill in the remainder of the 'thin' boards so they are even with the spine stiffener.
Making the Spring:
Levered out by the thin boards, the spring causes the textblock to throw itself upward upon opening.
Do not open book until the after the spring has completely dried. The book will need to be opened in order to complete the turn-ins.
Determine the thickness of the 'thick' board. Account books generally had thicker boards, so a 96pt board may be appropriate. The spring will equal the thickness of the 'thick' board.
There are two styles of 'built-up' spring. The one described in this article has all the layers lining up so that the edge is perpendicular to the board. The other style builds up the spine in layers which are cut to the same width. As the layers are built up, the spring will develop a rounded edge which is mirrored by the board and smoothed by sanding.
Using a pencil, mark 3-4 mm from the shoulder creases onto the boards. This will indicate the width of the first layer of the spring. The image below with the first spring layer on shows how the spring extends on to the spine stiffener.
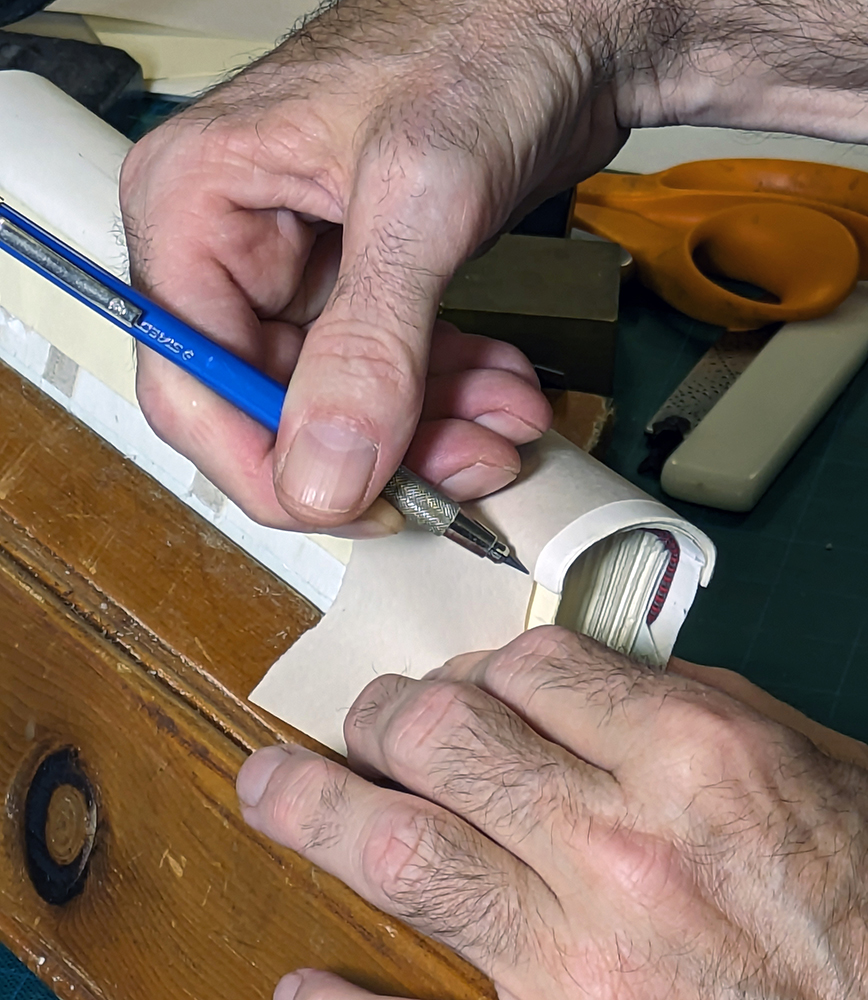
Transferring the measurement to the spring layer. Use a heavy-weight paper like Stonehenge or thin folder stock.
 width of spring layer.jpg)
Cut a strip
to wrap the spine the width of the space between the marks. With a folder, score
the 3-4 mm on each side of the strip which will extend onto the boards. This
will make it easier when rubbing down the layers of the spine. The length should
be longer than the height of the boards and will be cut down later. Dampen the strip and adhere to the spine with PVA making sure everything is
even and rubbed down well with the bone folder. Build up the spring in layers, measuring each layer individually to ensure
that they line up, and rubbing down well each time until the thickness of the
binders board used for the boards is reached.
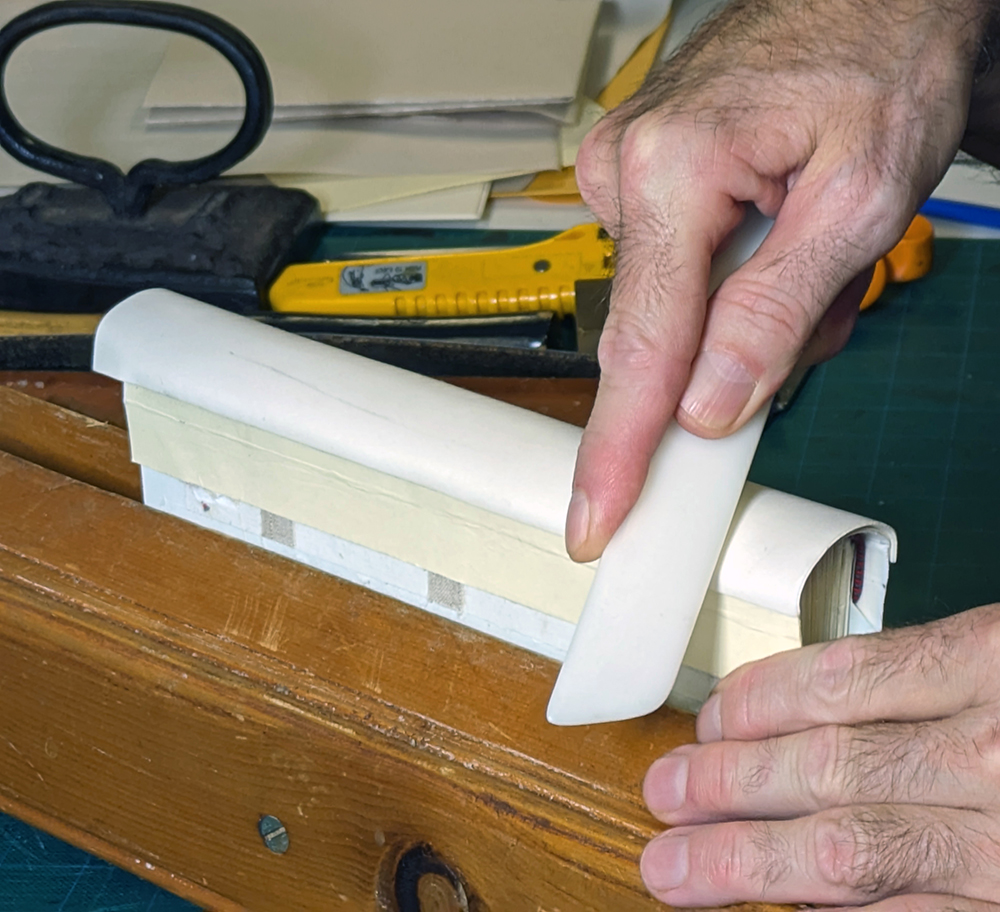
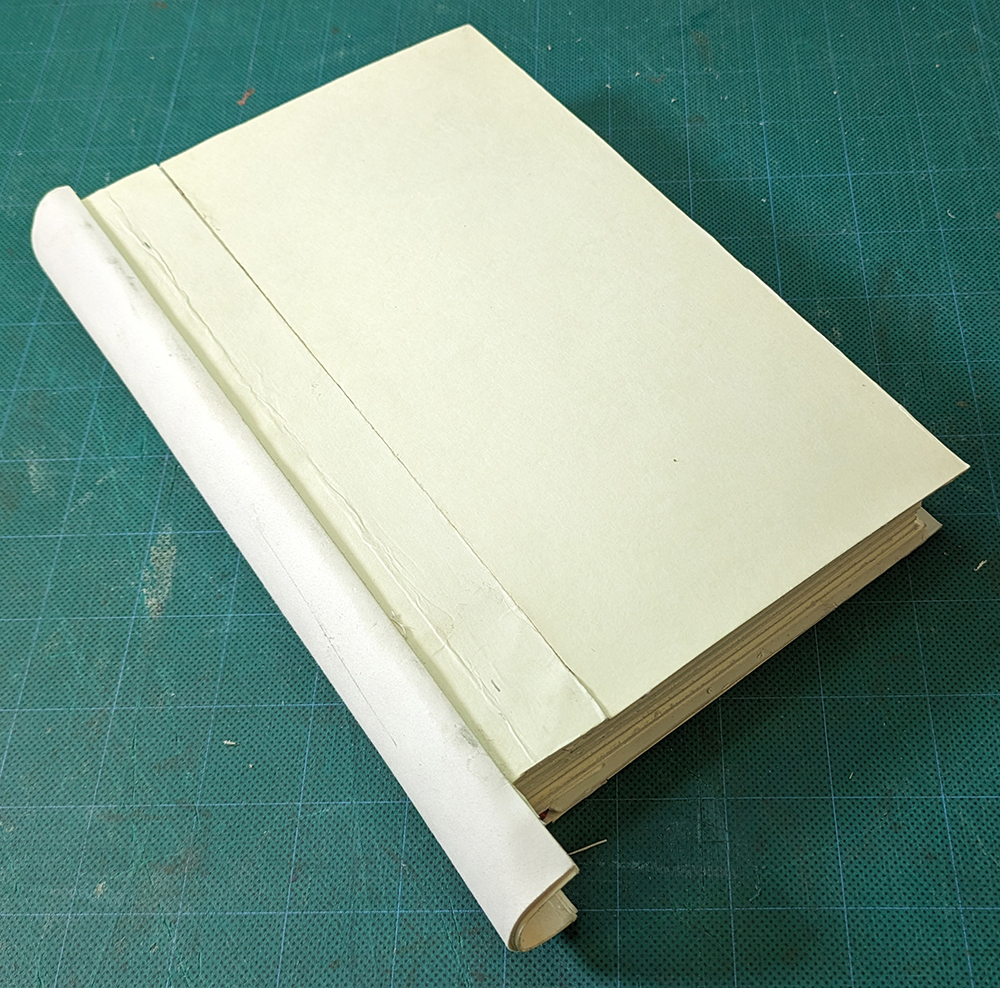
The completed spring on the book.
Thick Boards and trimming to size:
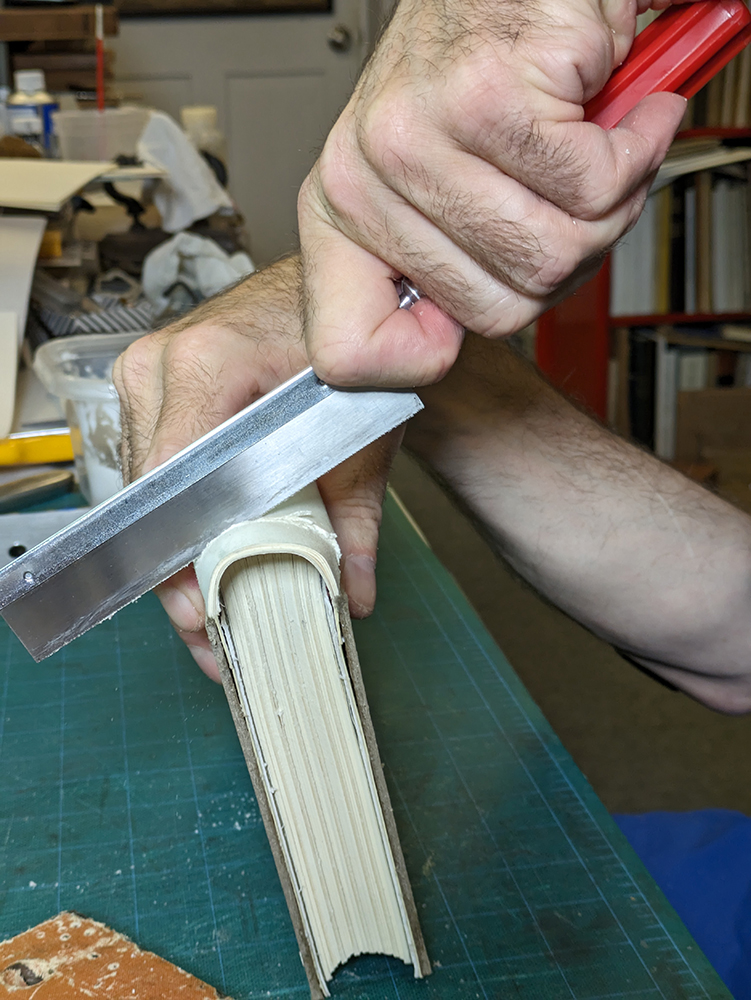
Cut the two pieces of binders board to be used for the boards to the size of the thin boards, less the distance to the 1cm crease by the spring. At the 1 cm crease, adhere the binder's board to the thin board with PVA making sure it is parallel to the spring on the spine. Place in the press and give a good nip. To trim the boards, I like to use square trimming rules (Kantenlineal) available from Schmedt. Next, using the boards as a guide, cut the spring ends to the final height with a fine-toothed saw and lightly sand edges. Mae sure not to cut into the endbands ...
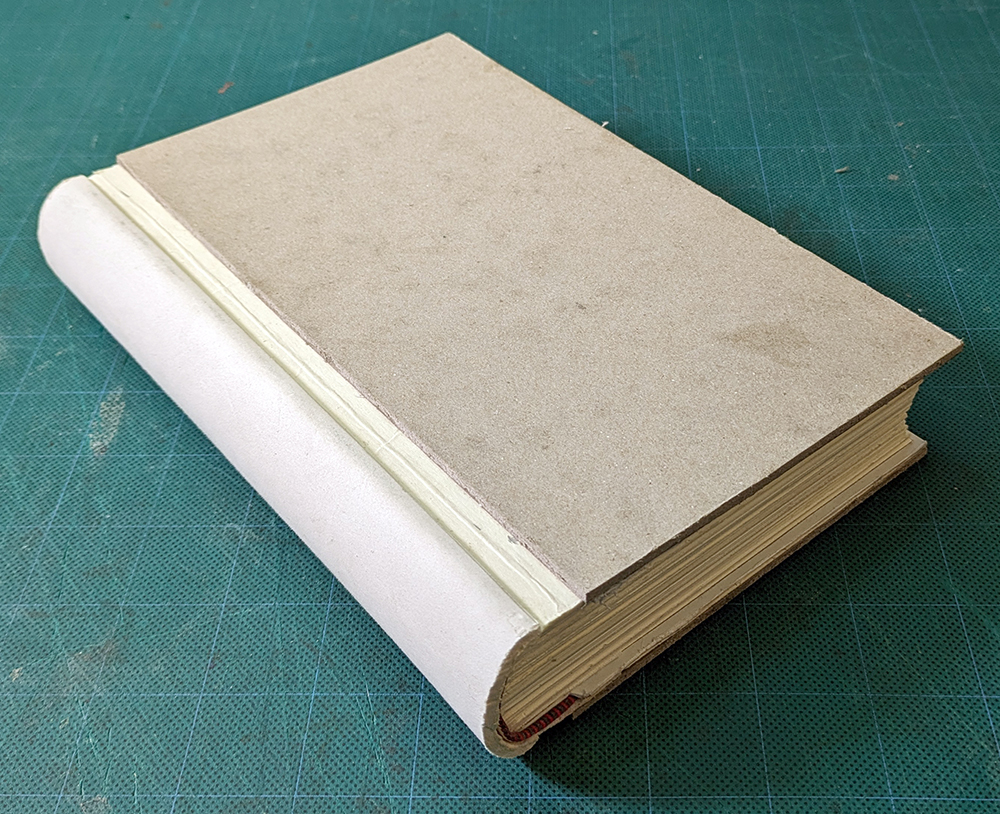
At this stage you may carefully open the book to check on the spring.
Below, a cross-section showing make-up of boards and spine
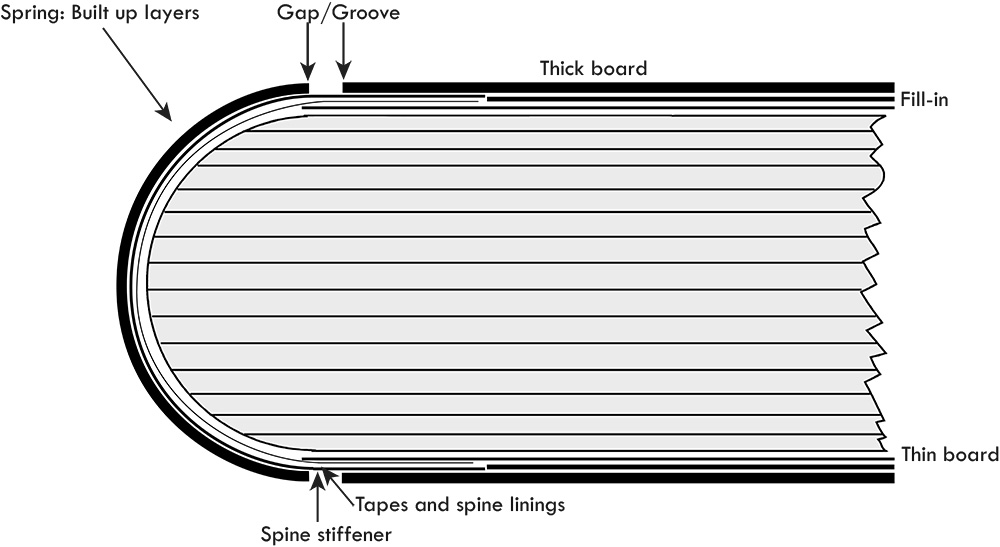
Covering:
Cut the cloth or leather to size. If cloth is used, it should be an unsized cloth such as linen, moleskin, or denim to make it easier to work the turn-ins. Cloth can be left natural, or colored with acrylics or fabric dye. With unsized cloth, it may be necessary to apply the adhesive to the spine and boards rather than to the cloth. The covering process will be similar to other books bound 'in-boards.'
Tear off the waste sheet that initially held the 'thin boards' and sand smooth.
Adhere the material to the spine first, then work into the grooves and across the boards. Cut strips of board to fit and press to ensure good adhesion in the groove. If working in leather, take precautions so as not to crush the grain. Take out strips, and let dry under light weight.
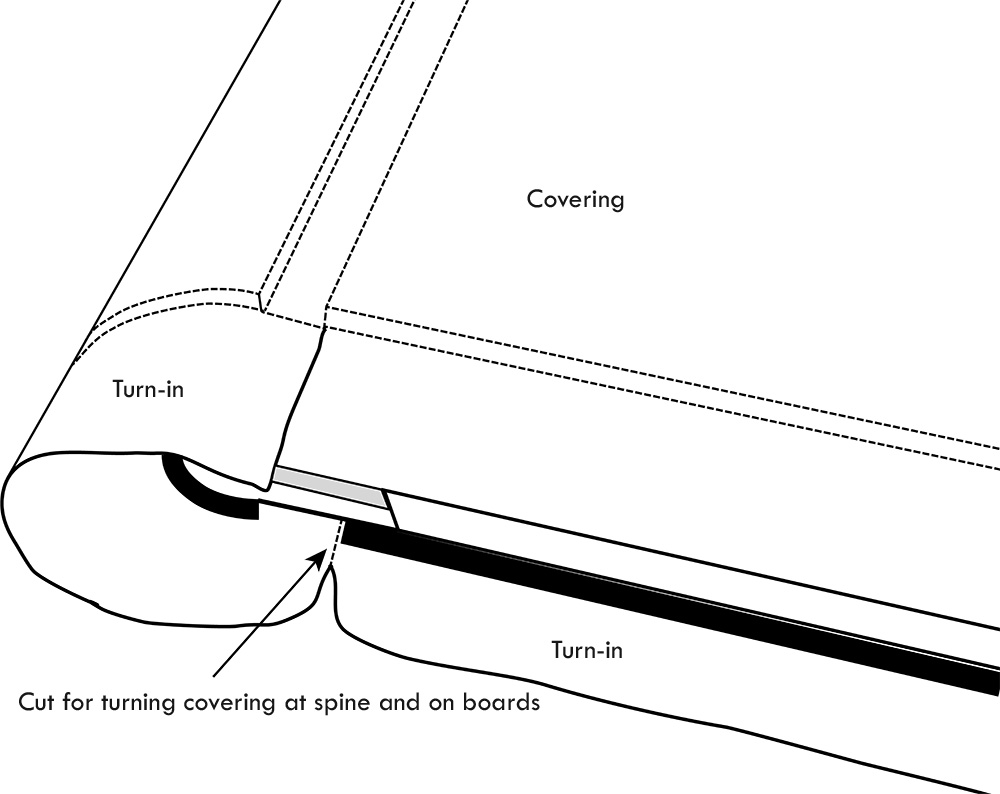
Next, make an incision into the covering material about 1cm from the shoulder. The incision should stop slightly more than a board thickness away from the edge of the board to allow the material to be turned in.
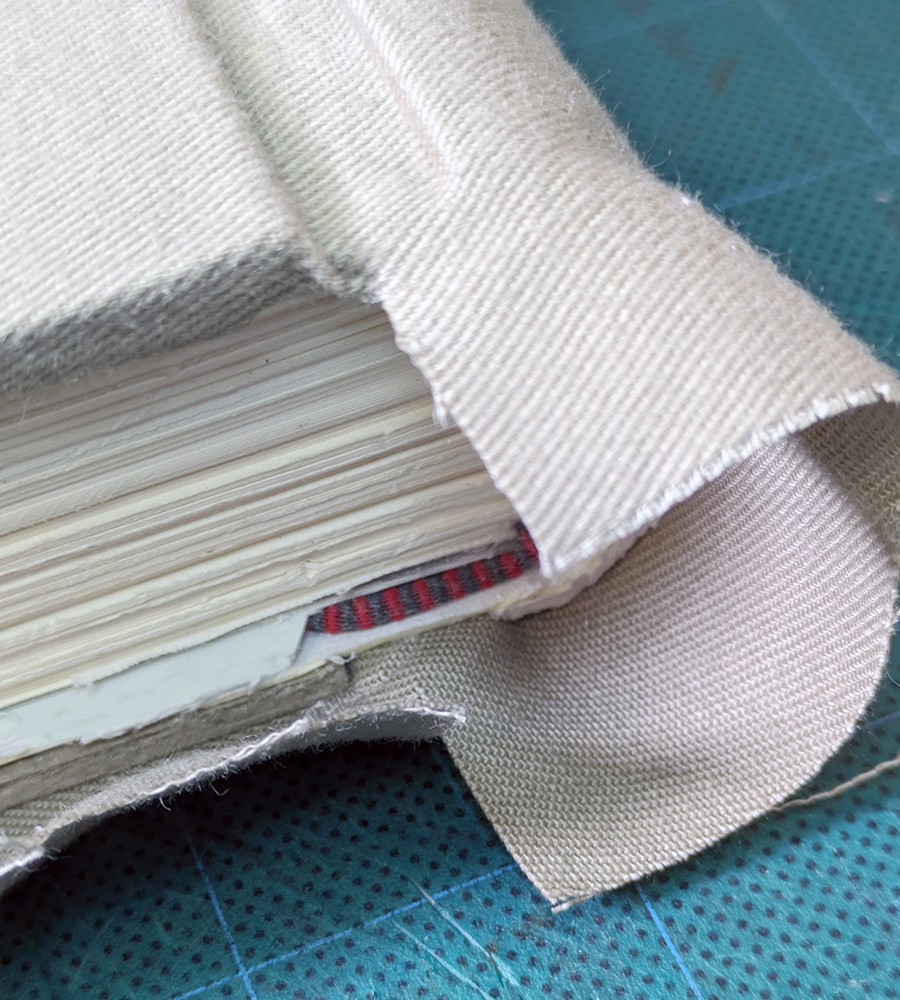
Carefully open the book, working towards the center. Turn in at the spine, making sure the material is smooth, particularly under the spine stiffener.
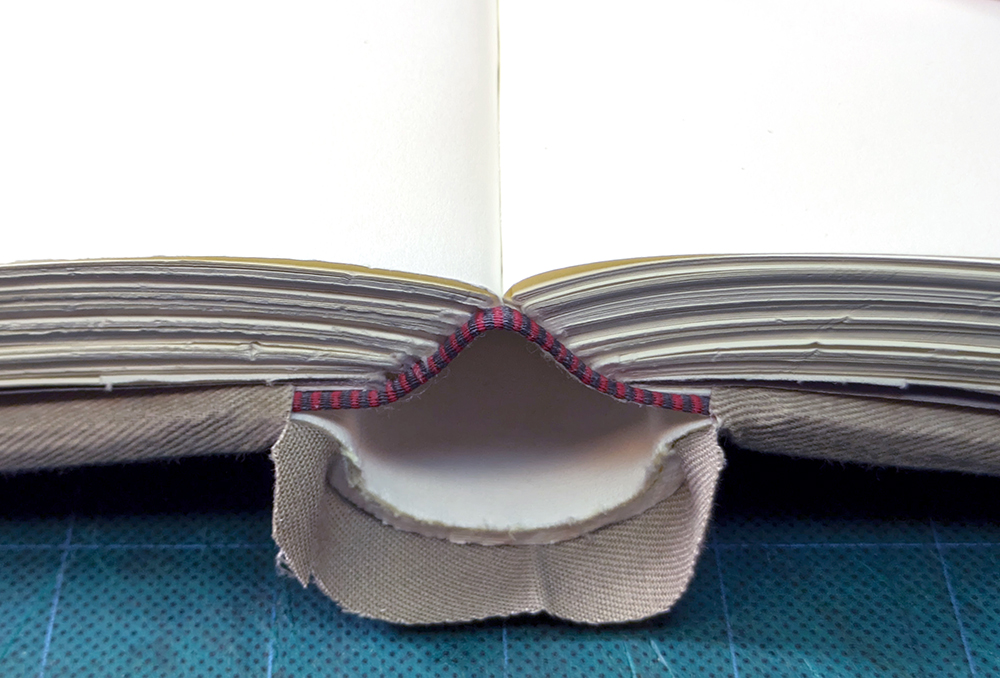
Turn in the remainder of the head and tail, then the fore-edge.
When dry, trim out. Fill in as appropriate. Finally, put down the paste-down/boardsheet.
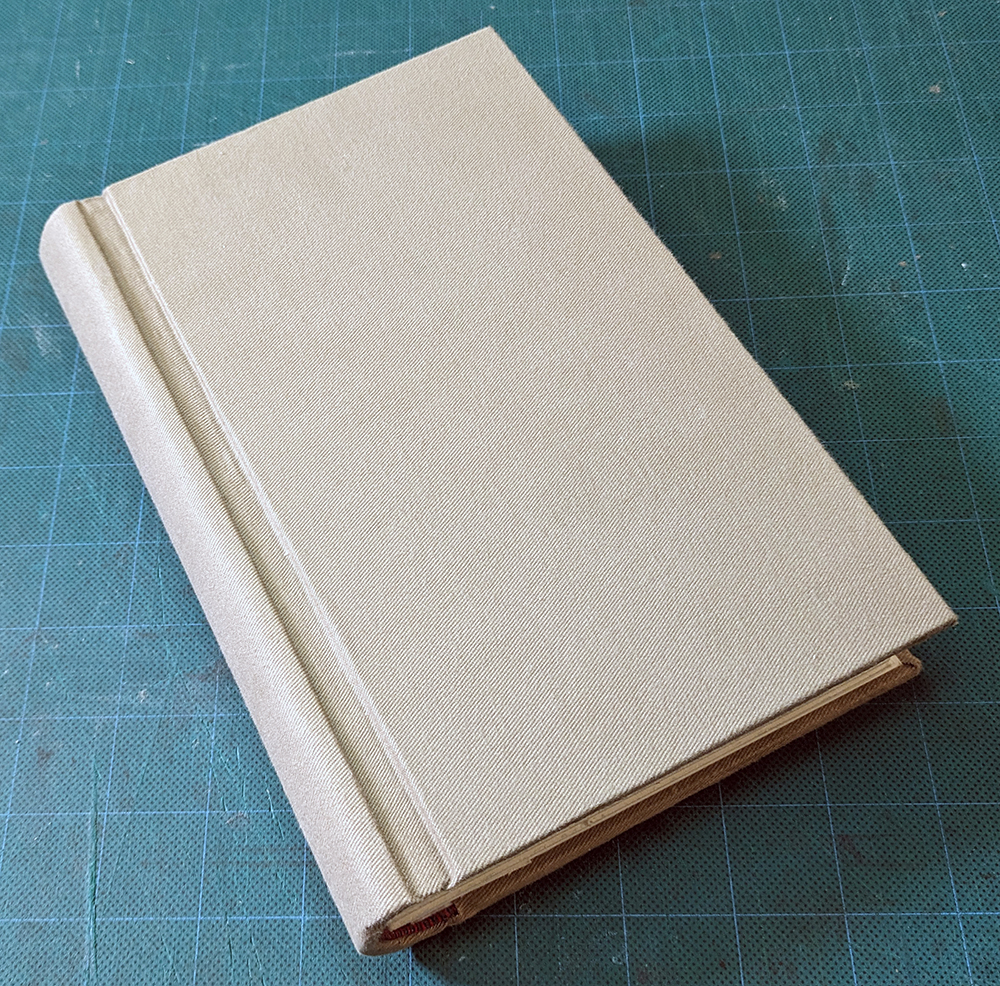
Open book showing action of spine
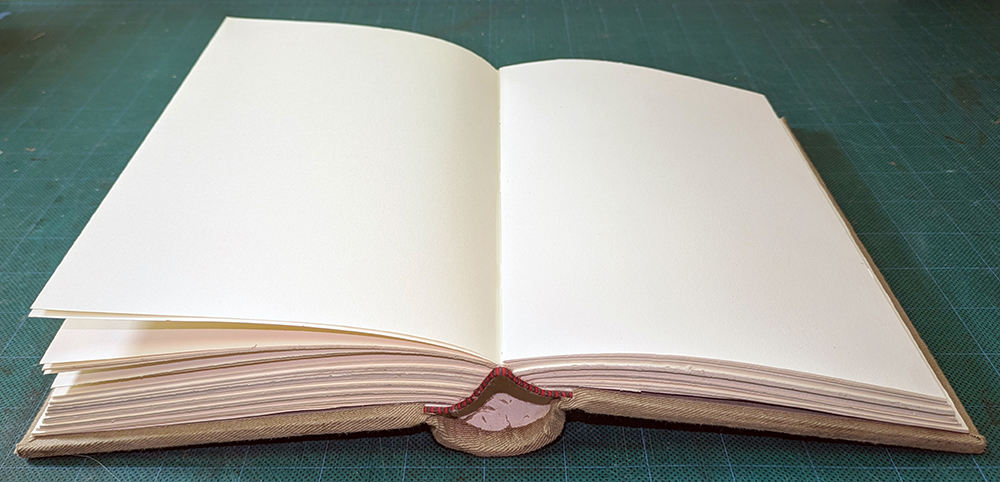
Finally, carefully leaf through the book from front to back, and back again.
Enjoy, and watch it S P R I N G!
For more inspiration visit the Bonefolder's 2004 Springback Bind-O-Rama, Springbinding Hath Sprung. See also posts on the Pressbengel Project blog.
To view springbacks being made by hand on industrial scale visit the "Geschäftsbücherfabrik König" collection at the Deutsche Digitale Bibliothek.
As "the Gipper", Ronald Reagan said to Gorbachev in regards to arms control, "trust but verify". So, do as these gents from the "Geschäftsbücherfabrik König" do, perhaps more gently. Image desription here.

Selected Bibliography:
Description of the style:
Don Etherington and Matt Roberts. Bookbinding and the Conservation of Books: A dictionary of descriptive terminology. Washington, D.C.: Government Printing Office, 1982.
Middleton, Bernard C. (1996) A History of English Craft Bookbinding, New Castle, DE: Oak Knoll Press.
English style:
Government Printing Office (1962) Theory and Practice of Bookbinding, Washington, D.C.: Government Printing Office.
Hasluck, Paul N. (1912) Bookbinding, Philadelphia: David McKay.
Mason, John. (1933) Bookbinding and Ruling, London: Sir Isaac Pitman & Sons, Ltd. This is volume 5 of The Art and Practice of Printing: A work in six volumes, William Atkins, Editor.
Pleger, John. (1924) Bookbinding, Chicago: Inland Printing Company.
Vaughan, Alex J. (1996) Modern Bookbinding, London: Robert Hale.
Verheyen, Peter D. (2004) The Springback in the English Tradition.
Whetton, Harry (1946) Practical Printing and Binding: A complete guide to the latest developments in all branches of the printer's craft, London: Odhams Press Limited.
German style:
Henningsen, Thorwald (1969) Handbuch für den Buchbinder, St. Gallen: Rudolf Hostettler.
Kersten, Paul (1921) L. Brade's Illustrieres Buchbinderbuch: Ein Lehr- und Handbuch der gesamten Buchbinderei und aller in dieses Fach eingeschlagenden Techniken, Halle: Verlag von Wilhelm Knapp.
Lüers, Heinrich (1943) Das Fachwissen des Buchbinders, Stuttgart: Max Hettler Verlag.
Moessner, Gustav (1969) Die Täglichen Buchbinderarbeiten, Stuttgart: Max Hettler Verlag.
Verheyen, Peter D. and Conn, Donia. The Springback: Account Book Binding. London: Designer Bookbinders, The New Bookbinder, Vol 23, 2003.
Wiese, Fritz (1983) Der Bucheinband: Eine Arbeitskunde mit Werkszeichnungen, Hannover: Schlüterische Verlagsanstalt und Druckerei.
Wolpler, Florian. Der Sprungrücken. Online tutorial, in German.
Zahn, Gerhard (1990) Grundwissen für Buchbinder: Schwerpunkt Einzelfertigung, Itzehoe: Verlag Beruf + Schule.
Notes and References:
1 Middleton, Bernard C. (1996) A History of English Craft Bookbinding, New Castle,
DE: Oak Knoll Press, pp. 114-116.
Notes on Contributors:
Peter Verheyen is Conservation Librarian at the Syracuse University Library. Primary training was through formal apprenticeship at the Kunstbuchbinderei D. Klein in Gelsenkirchen, Germany, and study at both the Centro del bel Libro in Ascona and the Folger Shakespeare Library. He has worked with William Minter in Chicago and at the Yale and Cornell University Libraries. His work has been exhibited widely with the Guild of Book Workers and in other exhibits in the US and abroad. Teaching activities have included ongoing classes and workshops on specific topics. He is also past exhibitions and publicity chair for the Guild of Book Workers. In 1994, he founded Book_Arts-L and the Book Arts Web at <http//www.philobiblon.com>. For more information see his curriculum vitae.
Donia Conn was introduced to bookbinding through a required art class at St. Olaf College in Minnesota. While a Ph. D. student in Mathematics at the University of Wisconsin -Madison, she started working with Jim Dast in the library’s book repair department. After taking bookbinding classes at the Minnesota Center for Book Arts she entered the Conservation Studies program at the University of Texas - Austin. Donia has interned with Tony Cains at Trinity College, Dublin and J. Frank Mowery at the Folger Shakespeare Library in Washington DC and has worked as a book and paper conservator, as well as binder-in-residence, for various institutions across the US. She served as Head of Conservation Services at Northwestern University Library and worked for NEDCC doing outreach and training. She is currently working in private practice. For more information see her curriculum vitae.


